
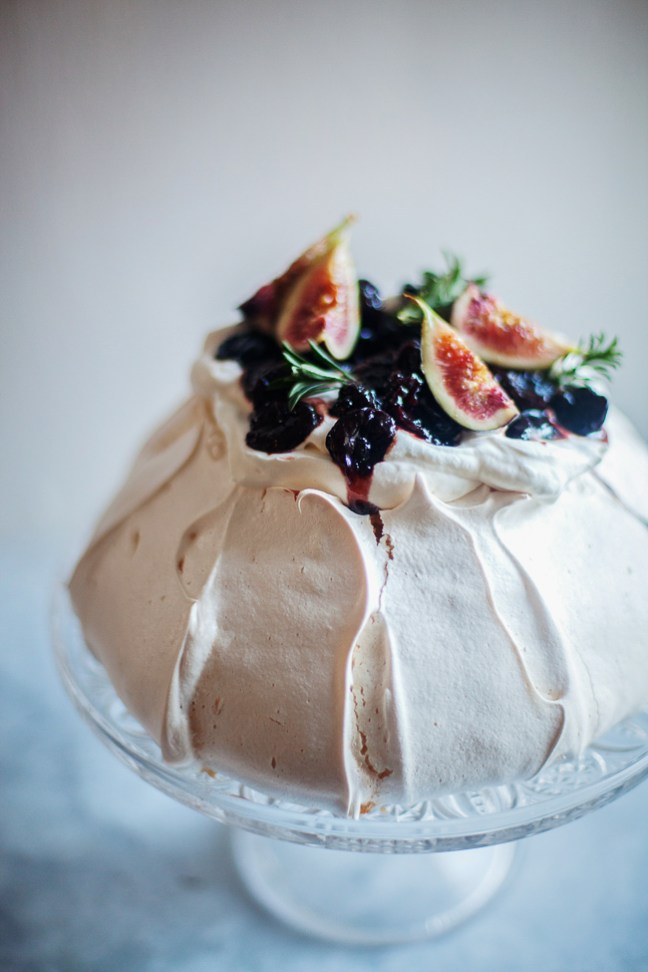
This ethereal crown of meringue, filled with cream and berries is a Pavlova. The name comes from the ballerina, Anna Pavlova, who was performing around the world in 1926 and made a stop in the land down under. From there the details get a little fuzzy and no one is quite sure if it was a pastry chef from Australia or New Zealand who first made this dessert for her. It causes a heated debate amongst them if you declare it one way or the other, so I am staying vague on the origin.
This is one of my favorite desserts, because I am a huge fan of meringue in just about any form. I love how it looks, how it tastes and the texture it lends. Pavlova, unlike other meringues, is made with vinegar and cornstarch, so the end result is crisp on the outside, but still has some tooth (chew) on the inside. Traditionally it is served with fruit, such as berries and passionfruit (that’s what is dripping off the edge) and whipped cream. I also added lemon curd, but there are no rules and you can fill this with whatever moves you.
The recipe is in Zoë Bakes Cakes and you can watch me make, shape, and bake this Pavlova in my instagram video.
Tropical Fruit Resources
Tropical fruit and purees can sometimes be hard to find locally, so I often order mine online.
- Fierce Fruit (for Fruit Purees)
- Frieda’s
- Melissa’s Produce
- Miami Fruit
- Rincon Tropics
- Tropical Fruit Box
- Vanilla Beans
Other Ways to Make a Pavlova

Heart Shaped Pavlova
To make the heart shape: draw a heart-shape that measures 10 inches wide and 10 inches tall. The size is really up to you, but that’s about what I did here. Then I sprinkled edible dried rose petals from SOS Chefs on the meringue before baking. I baked the heart-shaped pavlova for the same amount of time as the recipe below, but it may require less drying out time in the oven once the oven is turned off.

Pavlova FAQs
1. Why add water to the meringue?
Water makes for a thinner, more delicate meringue, so the end result is not rock hard, but a tender (soft) interior, while still crisp on the outside. Adding the water makes the egg foam less stable, which is why it’s SUPER IMPORTANT to also add the vinegar, which strengthens the proteins and helps make a strong but tender foam.
2. Why add vinegar to the meringue and why at the end?
Normally I would add an acid (either cream of tartar or vinegar) at the beginning of whipping the whites to help add stability and ensure a strong foam that won’t weep moisture. But, I was adding the water to thin out the whites, so I waited until after they were fully whipped before adding the vinegar. It still does its magic as long as it’s added before baking.
3. Why add cornstarch to the meringue?
Adding the starch to the foam helps create a softer meringue and one that is easy to cut, opposed to a meringue that shatters when you touch it with the knife. Because it interferes with the structure of the eggs (that’s why it’s softer), I whip the whites until STIFF and then I fold the starch in at the end. The starch also prevents the baked meringue from shrinking.
4. Why leave the light on in the oven after the pavlova is baked?
The oven light puts off just enough heat to keep the pavlova dry until you are ready to fill and serve it. This is key in the humid summer months. It can sit in the oven for up to 24 hours with the light on.
5. Can you make a pavlova if you don’t have an oven light?
You can still make the pavlova, but don’t open the door until you are ready to serve, and don’t try to make it WAY in advance if you live in a humid climate.
6. How can I prevent the pavlova from cracking?
There are a few reasons your pavlova may be cracking. Here are a couple of things to make sure of:
- Mix it to the right consistency, stiff peaks, so it’s not expanding too much in the oven.
- Your oven may run hot, which means the pavlova is expanding quickly in the oven and it can cause cracking. I suggest getting an oven thermometer to check the temperature.
- Mix it long enough so the sugar dissolves into the egg whites so that it becomes a uniform glossy mixture. MAKE SURE to use superfine or caster sugar so it dissolves quickly.

7. How far in advance can I make a pavlova? How long does it keep without filling?
You can bake the shell about 24 hours in advance. Leaving it in the oven with just the light on will keep it from absorbing any moisture. Much longer than that and it starts to get brittle!
8. How can I prevent the pavlova from getting soggy in the fridge?
If you put it in the fridge, it will become soggy. Make it just a few hours before serving. It’s not something you want to do a day ahead. Hold off on adding fillings until you serve it.
9. How can I prevent the pavlova from smelling or tasting eggy?
To ensure your pavlova doesn’t taste or smell eggy, be sure to whip the egg whites to stiff peaks, so they are properly aerated, and bake it thoroughly.
10. What is the difference between regular granulated sugar and superfine sugar?
Superfine sugar is more finely ground than regular sugar, but not so fine that it becomes powdered/confectioners’ sugar. You can make superfine sugar in a food processor if you can’t find it near you. Simply add granulated sugar to your food processor and process until it produces what looks like smoke (but is actually just sugar dust), about 5 minutes.
11. What should I do with all my extra egg yolks after making this recipe?
Creme brulee and lemon curd are both recipes that use lots of egg yolks!

Equipment
Ingredients
- 150 g egg whites ~ about 5 egg whites at room temperature
- 1 pinch kosher salt
- 1/8 tsp cream of tartar optional. It will make the meringue stronger, especially if you have older, weaker egg whites
- 3 tbsp cold water
- 1 1/4 cups (250g) superfine sugar how to make superfine sugar
- 1 tbsp plus 1 teaspoon cornstarch
- 1 tsp vanilla extract
- 1 tsp vinegar white wine, cider or distilled
For Serving
- 1 recipe Perfect Whipped Cream
- 1 cup Lemon Curd divided
- Fresh Raspberries and / or Passion Fruit for filling and topping
- Confectioners' sugar for dusting
Instructions
- Preheat oven to 275°F / 135℃ and place a rack in the bottom 1/3 of the oven. Trace a 6-inch / 15cm circle on a piece of parchment and set it, upside down, on a baking sheet.
- In a stand mixer fitted with the whisk attachment, combine the egg whites, salt and cream of tartar (if using) and beat on medium-high speed until medium stiff peaks form, about 3 minutes.
- Turn the mixer speed to medium-low and drizzle in the water. Slowing sprinkle in the sugar a little at a time; this may take a minute or so. Turn the speed to high and whip until very stiff, glossy peaks form, about 5 minutes.
- Using the whisk attachment or a rubber spatula, gently fold the cornstarch, vanilla, and vinegar into the egg whites.
- Mound the egg foam into the circle on the prepared parchment paper. Using a metal spatula, smooth the mound, then swipe grooves into the foam, creating curls at the top. Very gently create a crater at the top, like a volcano, where the grooves meet. (see me do this on Instagram)
- Bake for 60 minutes or until the meringue starts to turn a very pale tan color, then reduce the heat to 250°F and continue to bake for 45 minutes. Turn off the oven (don't open the door), turn on the light in the oven (don't stress if the light doesn't work) and let the meringue sit in the cooling oven for at least an hour, but it can be stored like this overnight or even up to 24 hours.
- The center of the pavlova will collapse, that's just the nature of the beast and where you will put your filling. If it does't fall into the cavity completely, use a paring knife to carefully open up a hole in the top. The outer edge may crack a touch too, but I've made this shape several times and it generally only cracks a little if you do not open the oven door. The inside should be soft, but not at all wet.
- Run a metal spatula under the pavlova to release it from the paper and carefully transfer to a serving plate.
- Fold half of the whipped cream into 1/2 cup / 130g of the lemon curd. Fit a pastry bag with a large round tip and fill with the cream-curd mixture. Alternatively, carefully spoon in the mixture. Spoon 1/4 cup / 65g of the remaining lemon curd over it, then sprinkle with some of the berries. Repeat with the remaining cream-curd mixture and then the remaining lemon curd. Finish with the remaining berries and whipped cream and then dust with confectioners' sugar.
- Refrigerate the pavlova for about 1 hour before serving to make it easier to cut.
Rate and Review!
- If you've made this recipe, please leave a rating and review! I love to hear how you've adapted my recipes to your own tastes, so please share how it went for you. It helps other people find my recipes. Thank you!
I watched your beautiful Instagram video! Now I must attempt to create this beauty. I have never eaten a pavlova, but looks luxurious! Cross your fingers as this home baker attempts this beauty.
Hi,
I’m attempting to make the pavlova and I wanted to know what’s the difference btwn superfine and regular sugar?
Also – If I’m making it on Thurs and serving on Saturday, will it hold? Can I keep the curd and toppings on the side until ready to serve?
Thank you!
Hi Mushky, superfine sugar is more finely ground than regular sugar, but not so fine that it becomes powdered/confectioners’ sugar. You can make superfine sugar in a food processor if you can’t find it near you. Simply add granulated sugar to your food processor and process until it produces what looks like smoke, about 5 minutes. You can actually watch Zoe do it in this video! https://www.instagram.com/tv/B_IUAoWH-LP/
Thank you Zoe! Will be trying this very soon!
This pavlova looks absolutely perfect!
Hi Zoe,
Thank you for sharing the recipe and instructional video. I love love how you explain the science and reasoning behind your ingredients and steps. It is wonderful!
Do you have a chocolate pavlova recipe or can I add coco powder to this recipe?
Hi Alyse, Zoë has a chocolate pavlova recipe in her book, Zoe Bakes Cakes. You can’t just add cocoa powder to this recipe, you need to make other changes as well. The chocolate version also cracks a bit more than this recipe.
Omg what a masterpiece! This is the most beautiful pavlova I have ever seen. Can’t wait to attempt to make this lol
I love your pavlova, it’s so beautiful. I will try your recipe this weekend. Thank you for sharing your wonderful creation and recipe.
Your tags give away that you think it’s Australian!
Hello, Your cake is beautiful ! I watched your video but sadly it doesn’t show you actually forming the meringue . I made the recipe twice. They both spread out to be quite large AND they both, unfortunately, cracked.
Since I was making it for a friends birthday party I filled one anyway, with the whipping cream, curd , berries etc and decorated it with items from my garden , violas, mint, lavender , strawberries leaves , it looked quite lovely, sans, one side missing . It was served alongside another slice of cake on a lovely rectangular dish with raspberry coulis drizzled around it. I tasted divine and got rave reviews … so as the saying goes, you can make lemonade from lemons or in this case, lemon curd !
Hi, I’m back with another comment… an apology, actually.. somehow I missed the full video and only got a slideshow with a few pictures of the progression of the cake, not the full video … Now I can try it a third time and hopefully with more success … Yours is such a beauty !
Hi Jane,
I am glad you found the full video and hope you had more success with the recipe.
Thanks, Zoë
Hello — approximately how many people does this serve?
Hi. It serves about 6-8, depending how large the slice. I have two giant teen boys, so it fed the 4 of us, but they each had two servings.
Thanks, Zoë
What a lovely sweets you are making!
I’m a home baker myself and I can’t stop making everything that tastes sweetly
How far ahead of time can you fill it? Once you do fill it with cream and curd of your choice should you store at room temp or in the fridge?
I plan to make this this weekend. How far ahead of eating can I fill it with the cream and curd and decorate? Will it be okay for a few hours at room temp or in the fridge? Thanks!!
Hi Calla,
You can refrigerate it for several hours before serving.
Cheers, Zoë
I have just recently discovered your posts and tutorials and I want to thank you, they are wonderful and a GREAT help.
that is just beautiful! i’m attempting my first ever pavlova…what would cause cracking on the outer shell other than opening the door? also, would using convection work well for this? (I have a new kitchen with an oven that has convection and am still trying to figure out how and when to use it!)
Hi Marisa,
It is best not to use the convection or the pavlova will bake too quickly and crack. Convection is great for browning.
Enjoy, Zoë
Hi Zoe,
I have attempted to make this Pavlova three times and every time it spreads out and ends up being quite large and short. I have seen you wrote best to avoid using convection but I only have convection oven and can’t turn off the fan.
Is there anything I can do to stop it from spreading out?
Thanks!
Hi Nila, the spreading likely comes from the egg whites being under whipped, rather than from using a convection oven. The convection oven would likely make the pavlova darker or it may crack, but it shouldn’t effect the spreading. Be sure that you’re whipping the egg whites long enough–to stiff peaks. This video Zoe made may also be helpful!
Just room temp 6 egg whites, 1 cup sugar, teaspoon vanilla extract. Whip up the eggs until peaks. Add your fine sugar until it’s all blended. Stir in vanilla extract. Make it a high as possible Pav. I do convection oven and works amazingly. Pav Instructions
Preheat the oven to 200 degrees F.
Place the egg whites in a large, clean mixing bowl, and add the cream of tartar and salt.
Whip the whites on medium speed until foamy and just beginning to turn white.
While continuing to whip, add in the sugar very slowly (about 1/4 teaspoon at a time).
When all the sugar has been added, turn the mixer up to high speed and whip until the meringue is glossy and very stiff.
Stir in the vanilla extract, then fold in the color (if using).
Transfer the meringue to a clean piping bag fitted with a French star tip, and pipe 1-inch diameter kisses onto a parchment-lined baking sheet.
Bake the meringues in the warm oven for 2 to 2 1/2 hours, or until light and crisp (do not brown).
Serve immediately.
I made this last night–swoon! Today I made strawberry whipped cream which my daughter loved! Topping with fresh fruit for dessert tonight! Last week I made the Pavlova Roulade which was outstanding!! I am loving my copy of your new book! Thank you for creating it so I can make delicious recipes for my family!! I am so grateful!!
Delicious!! Thank you ☺️ Making it tonight for Passover dinner.
I’ve made this twice. It’s incredibly beautiful and tastes like heaven,…and a showstopper! I’m making it again today for Easter.
I made a double recipe today using up leftover egg whites. It made four big pavlovas, each making 8 servings. I filled them with a combo of lemon curd, whipped cream, and kiwi, and arranged kiwi slices and fresh violets on top. This was a very special recipe and I will definitely make it again.
Just so you know, the baking temps are different here than on your instagram post. here it is 275, on instagram, 300. Mine is in the oven now, I cant wait to try it!
Hi Brittany, the version here is the updated recipe from Zoe’s new book! I hope you enjoy your pavlova!!
I made this about a week ago for the first time. I used a mixture of berries; fresh and frozen and of course your lemon curd and whip cream. I delivered it to a family of 7 and did not try it myself. It was a big hit and one comment was that I have a lot of desserts made by my wife and daughters and this one is the most delicious of them all!
I have your book and use it like an encyclopedia for baking success!
I am making the mini pavlovas now as dessert for a family. This time one will be reserved for myself! I found that initially my egg whites were not stiff enough to make the little curls and retain the proper shape so I beat the egg whites a bit longer.
I’ve tried Pavlova two times.. I thought I failed, as my Pavlova was totally ’empty’ inside. I threw it away.
A few days ago I’ve seen on David Lebovitz Instagram somebody doing your Pavlova, and to my surprise, it was totally empty inside, they filled it with I think whipped cream and some fruits and David was showing it, like it was good. For me it was fail.
How is Pavlova supposed to be? Doesn’t suppose to be soft inside? But not empty?
Hi Mia, Zoë has a helpful tutorial on pavlova so you can watch her make it! https://www.instagram.com/tv/B_IUAoWH-LP/
Thank you, I know how to make it, don’t need tutorial. My point is, that Pavlova is not suppose to be ’empty’, but soft inside. And Zoe’s is pretty empty too. I’m very surprised. Empty Pavlova is a fail.
Hi Zoë! I made your Pavlova and it looked done on the outside but was very wet and almost gooey on the inside. Where did I go wrong? Thank you!
Hi Alison,
The inside will be soft, but shouldn’t be gooey, so I suggest you bake it a little longer and let it sit in the turned-off oven for longer to ensure it has dried out properly. Every oven is different, so the timing can vary a bit.
Thanks for baking the pavlova! Zoë
Can I successfully double this recipe . I have made this as is several times and just loved it . But wasn’t sure how a double recipe would come out . Thank you Your Video tutorial is the best
Is it possible to get the Angel Pie recipe?
Hi Maureen,
I am working on getting it! Fingers crossed!
Thanks for watching the show! Zoë
Did you ever get the angel pie recipe. I was watching your show (which I love). I would love to have it.
Linda
Hi Linda! The angel pie recipe is a family secret from Rachel Swan, the guest on the meringue episode. But you could recreate something similar by using a meringue crust like this one, and filling it with lemon curd and whipped cream or whatever filling strikes your fancy!
I made your gorgeous Pavlova with lemon curd and fresh berries for the anniversary dessert with my husband. I did not include the whipped cream as it seemed that was gilding the lily. This was dessert the best I’ve ever made and I’ve made a LOT of desserts since Covid 19 began. I’ve always loved baking but a Pavlova seemed out of my league. Thank you for raising my skills and giving me another fabulous dessert to share with my family and friends.
Hi Sarahjane,
I am so thrilled you made the pavlova and Happy Anniversary!
Cheers, Zoë
This is absolutely delicious. We had made mushroom carbonara for dinner and had five egg whites begging to be used. I had lemon curd in the freezer, so we were set. While it cracked more than Zoë’s it didn’t take away from how delicious this is. My husband said it should be on the regular rotation – he had three pieces….
Hi Susan,
I am so thrilled you made it and enjoyed it. If the pavlova cracked a lot, try dropping the heat of the oven by 20 degrees next time and see if that helps.
Enjoy! Zoë
Thank you Zoë, I will try that. And a side note – I baked the one from your cookbook. We are loving all the recipes from your cookbook that we have tried so far, and can’t wait to try them all.
Thank you Susan,
I am so thrilled to hear that!
Enjoy, Zoë
Perfect pavlova.
Thanks for your recipe and video. I am from Australia and have eaten and made many a “pav.” Yours was unique! I gave it a go, even adding the cold water which seemed crazy and put it in the fridge after I added the cream and it worked! Thanks for adding the “reasons why” section too, Zoe.
This is the best pavlovas I’ve ever made! I had never heard of adding water but trusted the recipe. The result was a crispy exterior and pillowy interior…just perfect!!! The lemon curd was just as perfect to pair with it.
I have made your Pavlova many times and it has always come out beautifully. The curd is our absolute favorite! If I only learned one new thing to bake over the last two years, this would be my favorite.
This pavlova is delicious! You really can’t fail with the in depth instagram video. This was my first time eating and baking a pavlova, and it worked out perfectly!
I LOVE this recipe! It is truly the best Pavlova and this shape is just perfection – what a gorgeous tribute to our fabulous Prima Anna Pavlova. I have to say I have never made lemon curd and this was amazing. I make these now every few months when I get tired of my kids begging me for the “special” pudding. I have never filled it in advance and so this add to a bit of chaos after dinner. Do you think it will soggy down if I fill it in advance and put in fridge? There is no chance of any left-overs so I am not worried about storing it long term. PS. I also bough so Julia shirts from your video and they are so fun. Big love and thanks!
Hi Olga! We are thrilled you love this recipe. You can certainly fill and refrigerate, but only a few hours in advance. We can’t guarantee it would work if it was any longer than that. Cheers!
Just made this fabulous Pavlova for Passover!
Haven’t served it yet but am so excited as the meringue came out near perfect.
This is my 3rd “fancy” Zoe dessert… each one is an adventure.
Thank you Zoe!!
Of all the things I’ve learned to bake over the past 2 years, making a Pavlova is my proudest and most delicious!
I made this for Easter, splitting it into two (one to give, one to keep). Everyone loved it! You are absolutely correct when you say it’s a show-stopper! Beautiful and delicious. Someday I will make it with passion fruit, but this time I used lemon curd and raspberries! Thank you Zoe, can’t wait to try more of your fantastic recipes!
I made this for my husband for dessert. I did something wrong as it spread out a bit too much but tasted divine. He loved it so much , i consider it a rousing success. Thank you Zoe
Hello! Does the heart variation bake for the same amount of time as the classic shape?
Hi Jessica, it bakes for the same amount of time! It may require slightly less drying out in the oven after it’s been turned off. Enjoy!
Love this recipe. Works every time. Usually fill it with chantily cream rippled with lemon curd and fresh berries. This time I am going vegan for a difficult lunch date.
Hi zoe,
I wanted to make the heart shaped pavlova – would it have the same baking time as the original pavlova recipe of yours?
And if I want to half that recipe – would it half the time too?
Thank you!
Sana
Hi Sana! The heart shaped pavlova does bake for the same amount of time as the regular pavlova, but it may require less drying out time in the oven once the oven is turned off. Zoë says that halving this recipe will likely take less baking time, but the thickness is what determines the timing, so you will need to experiment with it since Zoë hasn’t tested the recipe that way herself.
Hi!
I’ve been enamored by the shape of this pavlova since I’ve seen ZoeBakes. I’ve made it twice. Once following the cooking times from Zoe’s cookbook and again allowing the extra 30 minutes cooking time from this recipe using an oven thermometer. Both times, the inside was under cooked (about 2 inches gooey, marshmellow-like consistency). How much longer of baking time would you suggest?
Also, the coloring has not been a pretty white, but more of a vanilla beige.
Hi Jackie – the consistency on the inside that you’re describing sounds like it’s as it should be. It should be soft, but not wet. I hope this helps!
This was so easy to follow and came out perfectly! Impressed family and friends with my first ever pavlova.
Hi! Step 8, second sentence is confusing???
Oh, phooey.
I was using yard eggs so I was using the weights. Unfortunately the 250 g of sugar didn’t reduce and I didn’t notice. *sigh*
I thought, because I was using a hand mixer, that was why the sugar wouldn’t dissolve (I used superfine). But it was just too much. It’s in the oven. It isn’t a pavlova — probably more like divinity. 😀
Followed the recipe precisely as it was written and baked it in a Viking oven. I placed an oven thermometer inside when it was preheating to make sure the temperatures were exact. I never opened the oven door, left the oven light on and allowed it to cool in the oven for 2 hours. I live in NYC and it’s chilly fall weather with humidity 50%-60%. The pavlova deflated by 2 inches during the bake and the inside was shiny, wet and gooey. It looked like raw egg whites. The perimeter of the pavlova was cooked, but wasn’t crisp – it was rubbery and sticky. So much time and attention spent, but very disappointing.
Hi Irene, we’re sorry the pavlova didn’t come out well for you! Zoe would like to help you troubleshoot, and her first question is: do you have a gas oven? If so, it bakes totally differently than electric and can be more humid inside. Once we know the answer to this, we can help troubleshoot. Looking forward to your response!
Pavlova came out as a show stopper. It looked amazing, tasted even better when I made it with the lemon curd, whipped cream and topped with pomegranate seeds and raspberries. Making it again for thanksgiving 🙂
Hi Julianna! We love to hear this. Thank you so much for taking the time to rate/review. Happy Thanksgiving!
I made this for Christmas Eve at my daughters following your directions. It was less white than your photos, perhaps because I left it in the oven (turned off) from midnight till 7am. I filled it with Noosa lemon yogurt (stirred lightly) then freshly whipped cream and topped with sliced clementines and mint leaves. My daughter and one of her guests work for an excellent caterer out of Berkeley so they definitely understand food – they both loved the Pavlova!!! Thank you so much!
I’ve been making this recipe for the past two years and it is a huge hit with my family! I like to make it over the Christmas season and turns out perfectly each time. Thank you for sharing this recipe, it’s amazing!
Made this for Christmas in Australia, turned out perfect, it is a great recipe, and easy to follow. Left it in the oven overnight, Everyone loved it. Thanks so much.
I have not only tried this recipe, but I have shown this to my daughter and my granddaughters. They are in infatuated with this Pavlova treat. My granddaughters now love making this every time. Thank you so much for starting a new generation on Pavlova.
Hi Leslie, thank you so much for sharing this with us! We are so thrilled that your family enjoys making it together. We really appreciate you taking the time to leave a rating and review. Happy baking!
I made this and loved it! Was wondering if I could do two at a time next to each other in my oven and have it work out? Any idea?
Hi Ashley, so glad you enjoyed the recipe! The short answer is yes, but it will take longer to dry out because the two will produce more humidity in the oven. Happy baking!