
About 30 years ago my father introduced me to Patricia, the most glamorous woman I’d ever seen. She wore a light blue polyester pant suit with eye shadow to match and had a pile of perfectly coiffed blond hair. She was lovely and clearly not from Connecticut, where we lived at the time. Just one word from her mouth and you could hear the south, Alabama in fact. Patricia is my stepmother and in honor of her Southern roots I made her a Red Velvet Birthday cake. Her mom used to make them for her when she was a kid. I wish I had her mother’s recipe, but I found one that was fascinating and dated back to WWII. The milk chocolate cream cheese frosting done in an elegant basket weave adds to the romance of the cake.
When I read the ingredients for the cake I immediately assumed that it had omitted a key ingredient: eggs. In fact, this cake is completely vegan; no eggs, butter or milk. Eggs act as a binder, a kind of glue that holds things together. When they are baked, the proteins set and hold everything else in place. So when I saw that this cake didn’t have any at all I wondered what the texture would be like, paste came to mind. In fact, I was so doubtful I had a back up recipe all ready to go. But, what do you know, it was fantastic. Moist, rich, despite the lack of any butter or eggs and absolutely delicious. Why?

Created during a time when things like eggs and butter were hard to come by, this cake relies strictly on the gluten (protein) in the all-purpose flour to create the structure. The water in the recipe interacts with the proteins in the flour, with a little help from acid (lemon juice, cocoa powder) and some salt to work its magic. Both the acid and salt give the protein a little boost of strength and it all comes together in a truly remarkable cake. It gets its rise and lightness from just a touch of baking soda, no baking powder at all. The soda interacts with the acid and produces carbon dioxide bubbles. Essentially, you are making your own baking powder; baking soda + acid. Ok, maybe that is more food science than you wanted, but it is absolutely fascinating, at least to me!
Vegan Red Velvet Cake
From Something Warm from the Oven: Baking Memories, Making Memories by Eileen Goudge. Find the full recipe below.
To make the cake:
preheat oven to 350 degrees. Grease and then line the bottoms of two 8-inch round cake pans with parchment.
Place the flour, sugar, cocoa, baking soda and salt in a food processor, and let it whir to combine for about 30 seconds.
In a separate bowl, whisk together 2 cups of cold water, the oil, vanilla, food coloring and lemon juice.
Pour the wet ingredients over the dry ingredients and whir in food processor until blended.
Pour the batter into the prepared pans and firmly tap the pans against the counter several times to release any air bubbles.
bake for 25-35 minutes, or until tester comes out clean. Cool the cakes on a rack before inverting them.
To make the Milk Chocolate icing:
Melt the chocolate over a double boiler, remove from heat and allow to cool to room temperature.
Beat the butter until soft and fluffy, about 2 minutes. Add cream cheese and beat for another 2-3 minutes, scraping down the side of the bowl several times, to make sure there are no lumps. Blend in the lemon juice. Add the cooled chocolate and the confectioner’s sugar. Beat on medium low speed until spreading consistency.
To decorate the cake:

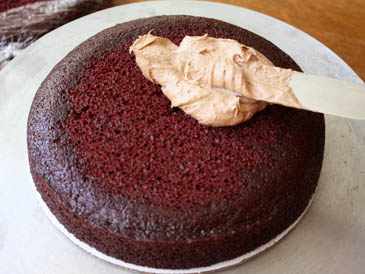
Start by setting the cake on a cardboard round, centering it on a Cake Stand and trimming off the top of the cake layers. You trim them if they are domed or just to remove the outer layer, which is often a different texture. It makes a great snack while your working.
Put a large amount of icing on the top of the cake. It should be about 1/4-inch thick when spread over the entire surface of the top.

Spread the icing out with a Spatula so that it is completely covers the top and is level, it should overhang the edge by about 1/4-inch. Flat, not smooth, is the goal.

Now you want to cover the sides with icing. Again, you are just trying to get it covered, don’t worry about smoothing it out until all the cake is completely covered.

Now you want to smooth out the sides. Hold the spatula straight up and down, but at a 20 degree angle away from the cake. If the spatula is flat against the cake you will end up scraping all of the icing off. At this point you never move the spatula, just turn the cake stand and the spatula will run over the surface of the cake. You are not applying any pressure, just hold it steady and it will gradually smooth out the surface.

Once the sides are as smooth as you want, then you do the same thing on the top. Start on one side of the cake and gently smooth out the surface, stopping midway. rotate the cake and continue until the cake top is smooth.

To create the basket weave you will need two pastry bags. One fitted with a Ateco round tip (#7) and the other with a basket Ateco basket weave tip (#47).
Start with the round tip and create a straight line up and down. With the basket tip pipe 1-inch lines across the original straight line. Separate them with the width of the basket weave tip.

Using the round tip draw another up and down line directly over the ends of the 1-inch basket weave. Using the basket weave tip, start by tucking the tip under the straight line, so that the piping looks as if it is coming out from under that line. Then pipe 1-inch basket weave in the spaces that were left open.

Repeat this over and over until you have gone all the way around the cake.

I finished the top off with a very simple star tip pattern on top and some pansies from my garden!

Ingredients
- 3 cups all-purpose flour
- 2 cups sugar
- ⅓ cup unsweetened cocoa powder
- 2 tsp baking soda
- ¾ tsp salt
- ½ cup vegetable oil
- 1 tbsp vanilla extract
- 2-3 tbsp Red Food Color Link: https://amzn.to/3KgxVjs
- 2 tbsp lemon juice
Cream Cheese Frosting (Not Vegan)
- 12 oz milk chocolate
- 1 stick unsalted butter, softened
- 16 oz cream cheese
- 2 tbsp lemon juice
- 2 ¼ cups sited confectioner's sugar
Instructions
To Make the Cake
- Preheat oven to 350 degrees. Grease and then line the bottoms of two 8-inch round cake pans with parchment.
- Place the flour, sugar, cocoa, baking soda and salt in a food processor, and let it whir to combine for about 30 seconds.
- In a separate bowl, whisk together 2 cups of cold water, the oil, vanilla, food coloring and lemon juice.
- Pour the wet ingredients over the dry ingredients and whir in food processor until blended.
- Pour the batter into the prepared pans and firmly tap the pans against the counter several times to release any air bubbles.
- Bake for 25-35 minutes, or until tester comes out clean. Cool the cakes on a rack before inverting them.
To Make The Icing
- Melt the chocolate over a double boiler, remove from heat and allow to cool to room temperature.
- Beat the butter until soft and fluffy, about 2 minutes. Add cream cheese and beat for another 2-3 minutes, scraping down the side of the bowl several times, to make sure there are no lumps. Blend in the lemon juice. Add the cooled chocolate and the confectioner’s sugar. Beat on medium low speed until spreading consistency.
To Decorate
- Start by setting the cake on a cardboard round, centering it on a Cake Stand and trimming off the top of the cake layers. You trim them if they are domed or just to remove the outer layer, which is often a different texture. It makes a great snack while your working.
- Put a large amount of icing on the top of the cake. It should be about 1/4-inch thick when spread over the entire surface of the top.
- Spread the icing out with a Spatula so that it is completely covers the top and is level, it should overhang the edge by about 1/4-inch. Flat, not smooth, is the goal.
- Now you want to cover the sides with icing. Again, you are just trying to get it covered, don’t worry about smoothing it out until all the cake is completely covered.
- Now you want to smooth out the sides. Hold the spatula straight up and down, but at a 20 degree angle away from the cake. If the spatula is flat against the cake you will end up scraping all of the icing off. At this point you never move the spatula, just turn the cake stand and the spatula will run over the surface of the cake. You are not applying any pressure, just hold it steady and it will gradually smooth out the surface.
- Once the sides are as smooth as you want, then you do the same thing on the top. Start on one side of the cake and gently smooth out the surface, stopping midway. rotate the cake and continue until the cake top is smooth.
- To create the basket weave you will need two pastry bags. One fitted with a Ateco round tip (#7) and the other with a basket Ateco basket weave tip (#47).
- Start with the round tip and create a straight line up and down. With the basket tip pipe 1-inch lines across the original straight line. Separate them with the width of the basket weave tip.
- Using the round tip draw another up and down line directly over the ends of the 1-inch basket weave. Using the basket weave tip, start by tucking the tip under the straight line, so that the piping looks as if it is coming out from under that line. Then pipe 1-inch basket weave in the spaces that were left open.
- Repeat this over and over until you have gone all the way around the cake.
Happy Birthday Nana (Patricia)! xo Z
That is soooo cute! What a helpful tutorial. Love red velvet- my fave cake… but the basketweave is new for me.
That’s so gorgeous! Definitely perfect for a glamorous Southern lady. And the cake recipe is fascinating.
All I can say is, Wow! I’ll have to try this. The science IS fascinating. Where there is a will there is a way… Beautiful cake!
Stunning. I have no patience for the basket weave, so I admire this.
THe cake itself looks so delicious. I like the Alton Brown lesson 🙂
This is absolutely beautiful! A true feast for the eyes!
What a beautiful cake, Zoe. Your decorating always inspires me. But in this case, I’ve got a question about the cake recipe. Probably will sound like a silly one at that, but I’ll ask anyway since you’re always so gracious in your answers. I’ve always wondered if the food coloring is necessary in red velvet recipes if in fact one doesn’t care about the color of the layers. In other words, if a red velvet cake recipe tastes just divine, but I don’t care about the color, would it make any difference just to leave the food coloring out and call it chocolate cake? Thanks!
Hi Emilie,
No, it would make no difference at all in the baking of the cake. It won’t be a very dark cake like the Devil’s Food recipe. It will have a lighter color and may even have a natural tint of red, due to the reaction of the cocoa and all of the acid in the cake.
I only used it because it is traditional.
Enjoy! Zoë
Beautiful cake Zoe!
Thanks for showing the step by step on how the basket weave is done.
What a glorious looking cake. I really must try that basket weave some time.
Wow. I still can’t get over how good this cake looks without eggs and fat. Also, the piping on this cake is phenomenal. I could never have the patience to do all of that. I’ll just admire your work :).
Yummm & beautiful!!
Retweeted this post minutes ago:
http://twitter.com/tracitoguchi/status/2754211012
Love your food artistry 🙂
It is fascinating! I love food science! I think it’s the first time I see a red velvet cake with a chocolate icing!
wow. i’m from alabama and have been looking for a great red velvet recipe for AGES. this one looks fabulous, gorgeous and delicious. i’m about to go to school to become a pastry chef so the science is awesome and … inspiring! i’ve been following you on twitter for a while now but this is my first visit to your site. i’m about to comb it now. thanks zoë
First, the vegan cake is wonderful. I will definitely make them this fall. And, I love reading the food science. As to the basket weave, it looks doable from your tutorial, but I just don’t know.
I love the pansies around the base of the cake! They look so lovely with the basket weave pattern.
Gorgeous!!
I have every confidence that cake tastes as good as it looks, and that’s saying a lot. What a thoughtful birthday cake.
So, so beautiful. And what a wonderfully generous gift of your time and talents!
The cake looks beautiful! Reminds me of my brother’s wedding. He and his wife had a picnic basket wedding cake with fruit and flowers spilling out of it, absolutely beautiful.
Beautiful basket weave! I’ve never made red velvet with chocolate frosting before so I’m dying to try this! It sounds as great as it looks!!!
That cake looks gorgeous, just the thing for a special person.
Thanks for the basket weave tutorial. Hopefully my decorating skills will improve. 🙂
I’m vegetarian, and even though we eat eggs, we don’t like the “eggy” taste that comes through sometimes. So this cake is something I’m definitely making.
I hope you don’t mind I say I like the basket design and decoration. Too pretty!
I never had red valvet cake (well, I’m not from the US), but it looks so good I’m planning to try it some day 🙂
Red velvet cakes and cupcakes are so much fun to make. Everyone is always so surprised. Very southern. Your photo is delicious!
Yum! It’s beautiful, but all I really want to do is eat that cake….RIGHT NOW! I’m definitely trying to make that for my son’s birthday! Thanks!!
Beautiful cake and great tutorial. The cake recipe is just like wacky cake, but with red food coloring added. It totally would work without the red food coloring.
What a beautiful work of art! I did enjoy the food science, as well 🙂
Yummy yummy yummy! Red velvet is my favorite! I’m gonna make this for my birthday come September!
It was absolutely scrumptious! and as gorgeous as it looks. Zoe is superb!
Ok dear friend, this one I gotta try….this family is nuts about Red Velvet Cake that our daughter chose it for her wedding cake (we live in the South!) and it was baked by an award winning baker (so I obviously don’t have the recipe)….yours looks so fantastic. I can’t wait. Do stop by sometime if you have a second. I’m adding your blog! Roz
Loved the write up, first part read like an interesting novel.
The info on the food science behind was superb.
You can make it in a 9 inch by 3 inch cake pan w/o compromising on the texture of the cake, right?
Hi Sharon,
Thanks! I was so mystified by this cake that I followed the directions exactly, which is VERY rare for me.
It would be my inclination to bake it in a 9×3 pan, but I wonder if the cake has enough get up and go to withstand the extra weight.
My brother, who is a vegan, is coming to town soon and I’m going to make him this cake. I’ll try it in a 9×3 pan and let you know how it works.
Zoë
I’d never even heard of Red Velvet cake until a couple of years ago but I’ve been wanting to try it ever since. The basket weave is amazing.It looks too beautiful to eat. You must have the patience of a saint. I don’t think I’d even want to try that part.
Yum! Your basketweave is beautiful.
-Barb
amazin.to make it:))..love the whole learning….process….love to make it
Lovely recipe, thanks for posting, will try it.
Yay! Thanks for giving vegan cakes a good reputation!
Hi, I loved reading about your cake. I never had a chocolate one. We call them here in Mississippi, Italian cream cheese cake ( icing uses cream cheese, and cake is red velvet. I have your bread book and one day you stopped by
my blog. I love to do an interview on you on my blog. I love your blog so much. And your book! Should you find time in between baking.
i love red velvet and i’m totally in awe of your basket weaving piping!! that’s just out of this world. 🙂 you’re an inspiration x
yr cake is gorgeous! your piping is just perfect. must be really delicious. thanks for the recipe, will try it one day.
What a perfect, beautiful cake!! Stunning!
about all i can say is wow. i am speechless.
I love the basket weave on this cake! Patricia is lucky to have such an amazing stepdaughter!
You know what’s funny? When I was doing small scale catering, it was mostly cakes, and a lot of basket weave requests too! Can you find one cake on my blog? Just one, a The DB caramel! It’s so odd, since it was something I did ALL the time and loved!
Anyway, my basket weaves never looked as good as yours. That’s pure perfection, and a gorgeous, gorgeous cake. LOVE the photos too, but that’s a given with you 🙂
If your stepmother doesn’t realize how much you like her, I’m sure the basket weave drove it home!
Great backstory for the recipe, too. 🙂
Beautiful…just perfect for that Birthday cake for a special person:).
Love the basket weaves..:)
beautiful zoe!
oh wow look at that! simply wonderful Zoe, you really are a craftswoman.
This is gorgeous. Absolutely gorgeous.
Lovely cake! You did a great job!! Looks really yummy!
We have always called the red velvet cakes “Hereford” cake, after the red and white cattle, but then we lived on a ranch and raised them. I’ll have to pull out my mom’s old recipe to see if that is egg free and the chocolate cream cheese frosting is very intruiging.
planning to try this in part because of your description and all the raves but also because of the source – LOVE eileen goudge’s novels!!
Can you tell me if you could use this recipe for cupcakes, how many would you roughly get and how long should I cook them for? Thanks – Love you site!
Zoe – What a beautiful cake. I came back to your site for the fondant recipe for a birthday cake for my egg-allergic 3-year-old son, and was delighted to find a new recipe for eggless cake. Do you think the cake will work well covered in fondant, if I freeze slightly before covering?
Hi Jacky,
I’ve never read any of her novels, but think I will after making this cake!
Hi Alison,
I’d guess that you would get about 18-24 cupcakes from this recipe. I’d check them after about 18-20 minutes with a cake tester.
Hi Michelle,
I think it will work wonderfully with fondant, because it has a rather dense and moist texture it will hold up well to the weight. I was thinking of making it with fondant for my vegan brother who is here visiting!
Enjoy and thanks for writing! Zoë
That cake is stunning! I cannot find my words to describe how beautiful it is!
Cheers,
Rosa
I just made this recipe last night, however wasn’t brave enough to try the basket weave with the frosting just yet. I tried making cupcakes instead of the cake and it came out great! About 24 cupcakes with a bake time of around 18 minutes. The frosting was especially delicious. I’ve never had chocolate cream cheese frosting before, so it was a treat! I brought them into work today and everyone loved them!
My only concern was the red gel food coloring. I bought the one suggested and ended up using the entire bottle for the recipe which was only a little over a tablespoon. This was much less than the 2-3 tablespoons but perfect for the recipe!
If using powdered food color what if i must be zoe? or have to vary recipe? i haven’t gel paste food color now 🙁
thanks in advance :)))
ps: i don’t know too much English, sorry 🙁
Hi Zoe,
Love the recipe however I was wondering if you have the recipe for the white cream cheese Frosting. I have had the red velvet cup cakes and they always have this really creamy white (I believe it is cream cheese) frosting that’s so yummy. I don’t like chocolate so much so if you have the recipe for the white frosting it would be great!!!! I love your site..
thank you so much
Hi Susan,
Here is a fantastic white cream cheese icing that would be great with the red velvet!
http://zoebakes.com/?p=486
Give it a try! Zoë
great looking red velvet cake. basket weaving is the the patient! 🙂
This is gorgeous, I’ve always wondered how to do a basket weave on a cake. Thanks for the tips!
I’ve been looking for a good red velvet cake recipe. And, this is so beautiful.
Congratulations on your nomination.
Hi Zoe,
Thank you so much for the beautiful recipe and tutorial! I just have one question – is there a liquid missed out of the cake recipe? I just made it exactly as written, but when I mixed the wet and dry ingredients the result was a sandy rubble. Reread and double-checked my ingredients, I couldn’t see where I went wrong. Anyway I ended up adding water until it looked like a batter, and it came out delicious, could not tell it was vegan at all.
Hi Hazel,
Thank you for trying the recipe and I am so sorry that it was so unclear. You are right, I put the water in the directions, but failed to add it to the list of ingredients. It calls for 2 cups of water, is that about how much you added?
Thanks for catching that! Zoë
Hey Zoe –
I love the tutorial on the basket weave and who would have thought of a vegan red velvet cake. I’m going to have to try that. I’m from the south and red velvet is probably my favorite cake. I do have a question though. Once you have iced the cake and are preparing to do the basket weave design, do you transfer the cake to the dish that you plan on serving it on before you start the basket weave or after? I’m just curious as to how I would transfer it to another platter because I see that you’ve use a cake board that is pretty much the same size of the cake. Thanks again for the great tips.
Hi Kimberly,
I usually transfer the cake to the plate that I will be serving on before doing the basket weave. If you try to transfer after decorating you may run the risk of messing up all your hard work.
Have fun! Zoë
I love red velvet cake. Thanks so much for the basket weave tutorial.
Oh my goodness! I literally just made this cake (not the frosting yet) and it is heavenly! Unfortunately, I do not own a food processor and was a little apprehensive in making this recipe, but I decided to my Kitchen Aid and it came out great. Thank you for the wonderful recipe. I will make it again.
Hey Zoe!
Mom always made me red velvet for my birthday, and for years she used the waldorf-astoria recipe. I’m not positive, but I think that’s the recipe their mom (my Grandmommy) used as well. I’ll ask Mom next time I talk to her.
Also, Aunt Pat’s always been (at least in my mind) one of the most beautiful/glamorous women I know 🙂
Merry Christmas to you and your family!
-Erin
Zoe this recipe is thrilling, as I adore antique recipes so much. I plan on making this for my Husband’s birthday this weekend! As a southern boy, I know he will appreciate it though an injury to my hand will prevent me from using the exquisite basket weave. Tell me please .. was your step mother taken back to the cakes her mother made her?
Thank you so much for this!
Hello Zoe,
I love your site! Thank you for sharing all the recipes. Looking through your blogs it inspires me to bake. I’m always scared of baking, but with your recipes and instructions it’s makes it so easy to create a fabulous dessert. Thank you so much!!! I do have a question about the red velvet cake. I was wondering if you have a recipe for red velvet cupcake? I’m planning to make it for our anniversary. Thank you!
Marichu
hi zoe, this recipe turned out great for me. thanks so much!
Hi Zoe,
This cake looks beautiful! However, I wonder why there are 2 colors in the frosting: a light & dark (with the basket weaved) when you only made one batch? Did I missed something in reading your recipe?
Thanks.
Hi Deejay,
There is no color added to the frosting, just to the cake. The frosting is milk chocolate and that is what creates the color.
Hope that clears it up? Enjoy, Zoë
I’m going to have to try this one! I’m surprised it doesn’t come out dry with 3 cups of flour and only 1/2 cup of fat, but maybe the extra sugar adds moistness? It sure looks good as far as chocolate red velvet cakes go.
Hi Anna,
Because it is a “high ratio” (lots o’ sugar) cake, it is really very moist. I was fascinated with it because there are no eggs! It is wonderful!
Thanks, Zoë
Hi Zoe,
THANK YOU! This recipe has saved me a huge headache when a friend of mine, with dairy allergies and …. a fussy taste to boot, gave me the specs for her wedding cake. It’s beautiful, moist and rich.
Just to let you know how versatile it is, I doubled the quantities leaving out the colour completely, baked it in a 10″ round pan, at 140C in a fan assisted oven, for about 2hrs, having protected the side with wet newspaper wrapped in foil. I was dubious if the mixture would have enough structure to cope with being made big, but it did! When I’ll have trimmed the dome I will still have a 2 1/2 – 3″ tall cake! It will be double layered with morello cherry jam (tested on a trial, hmmmm….), sculpted into a cog shape (as you do… it’s a Steampunk themed wedding) and then covered in marzipan as the bride doesn’t like fondant and obviously I cannot use butter cream.
It sculpts ok, a bit crumbly but if you are careful it’s not too bad.
Oh, and the groom likes fondant a lot, so I’m stealing your home-made fondant recipe for his cake!
Thank you for the informative, well explained and well illustrated blog, it’s a treasure of baking information and inspiration! 🙂
Hi Silvia,
This is absolutely exciting! Thank you so much for coming back to share your story! 🙂
Cheers, Zoë
Hi Zoe,
Just one simple question, can I use white chocolate chips for the frosting instead the one you used just to make it white in color?
Thanks!
Hi Grace,
Yes, you can use white chocolate, it is wonderful!
Thanks, Zoë
Hi
Today I made this recipe as red velvet cupcakes for my cousin birthday. It is absolutely fascinating also to all the people whom ate these cupcakes. For a long time I have tried few recipes for red velvet and this one came out so nice I could not believe. Moist , not oily,super 🙂 Thank you
Hi Chloe,
Great, thank you so much for trying the recipe and letting me know!
Cheers, Zoë
Hi Zoe!
I’m planning to try out this recipe very soon! I just had a few questions 🙂 Would it still turn out okay if I divided the recipe in half to get a smaller cake? Also, could you tell me what brand of cocoa powder I should get? I can’t seem to find any that isn’t Dutch processed!
Thank you for your help! 🙂
Hi Emily,
Sure I think the cake will do just fine if you half the recipe.
I use Scharffen Berger, Valrhona, even Hershey’s special works wonderfully for many recipes.
Thanks, Zoë
wonderful cake!! wondering how the icing has 2 different colors when u made only one batch..the basket weave is dark n the icing is light colored..
H Ramya,
it is actually just an optical illusion. The buttercream is all the same color, but as it sits it does get a little darker.
Thanks and enjoy! Zoë
Dear Zoe,
The texture of the cake is fabulous, soft and moist. I have made it a number of times but somehow it tastes a little soapy on its own, though once masked in icing it covers the taste. Any ideas why it would take on a soapy flavor. I do follow the weights and procedures right down to the tee.
Thanks
WOW!! Sooo going to make this!!! I was looking at the colors of the MIlk choco frosting and the color of the actual weave decorations — How did you get the weave to be differently colored from the milk choco frosting?? Would food coloring work, because the way you did it, it looks stunning! Thanks! 🙂
Or would more chocolate be the key?
Zoe, I reviewed this same recipe, and linked back to your site for the recipe. Just wish my cake decorating skills were up to yours! Beautiful work.
Hi Zoe,
Love your stuff!!!
Can I sub dark Chocolate for the milk in the crm chs frosting?
Hi Jilly,
Yes, you can, it will be very tasty!
Cheers, Zoë
This looks so good. The recipe is very much like the Crazy Cake we made in 8th grade home ec back in the late 1970s. I still have the stained recipe card and still make the cake for a quick chocolate fix. Thanks for this elegant variation.
Hi Zoe
You have some lovely and amazing recipes, tried out this one. Actually I am baking my sons’s first birthday cake and planning to make 3 tier care with bottom layer as 12 inches red velvet cake. so tried this recipe with 12 inch pan. i poured whole batter in 12 inch pan, the cake looked little thin and top was little domed . so was wondering do i need to increase the batter and if yes then how much. moreover how can i bake flatter layer so that do not have to level my cake too much. And do you ever freeze your cakes before the big day
Also the outside of my cake was slightly overcooked , as in the cake left the sides of the pan 10 mins earlier than the time when whole cake was baked .
Hello! I made this recipe as cupcakes, but they turned out a bit dry, I used a hand mixer instead of food processor, could that have had anything to do with dryness? I may have baked them too long, too, any suggestions/ideas?
Hi Abby,
It is probably the over baking and not the hand mixer. Next time test them a few minutes sooner and I bet the problem will be solved.
Thanks, Zoë